> ## Documentation Index
> Fetch the complete documentation index at: https://docs.withflex.com/llms.txt
> Use this file to discover all available pages before exploring further.
# Shopify Marketing App
> Promote HSA/FSA eligibility on your Shopify store with badges, a dedicated landing page, and product eligibility synced directly from Flex.
The [Flex Marketing App](https://apps.shopify.com/flex-marketing) helps you surface HSA/FSA across your store. Add a dynamic eligibility badge to product pages, build a complete HSA/FSA landing page in minutes with pre-built blocks, and sync product eligibility directly into your Shopify admin. Together, these increase trust, improve conversion, and help your store rank for HSA/FSA searches.
**Why it matters**
* **Increase awareness:** Visible, trustworthy badges catch attention earlier in the journey.
* **Educate customers:** Built-in pop-ups walk shoppers through paying with HSA/FSA.
* **Boost conversion:** Customers are more likely to buy when they can use pre-tax dollars.
* **Increase AOV:** Customers spend more when they can use pre-tax dollars.
* **Improve SEO:** Pre-written HSA/FSA content helps you rank for HSA/FSA terms.
* **Save time:** Everything installs through the Shopify theme editor, no custom code.
## Getting Started
Installed before **07/07/26**? Reinstall the Flex Marketing App to take advantage of the latest updates.
Take a tour of the Flex Shopify Marketing App and learn how to optimize your storefront. From setting up product eligibility and creating collections, to adding a dynamic eligibility badge and launching an HSA/FSA landing page, this video walks through everything you need to implement HSA/FSA marketing best practices.
### Jump to a Section
Sync product eligibility to your Shopify admin and build smart collections.
Add the dynamic HSA/FSA eligibility badge to your product pages.
Build a full HSA/FSA landing page in minutes with drop-in blocks.
## Eligibility & Collections
Eligibility sync timing depends on your catalog size and other factors. It can be near-instant for small catalogs, but may take longer for larger catalogs with hundreds or thousands of products. Please continue checking your metafields.
[Watch this chapter (1:39)](https://www.youtube.com/watch?v=MKLTWzIokHI\&t=99s)
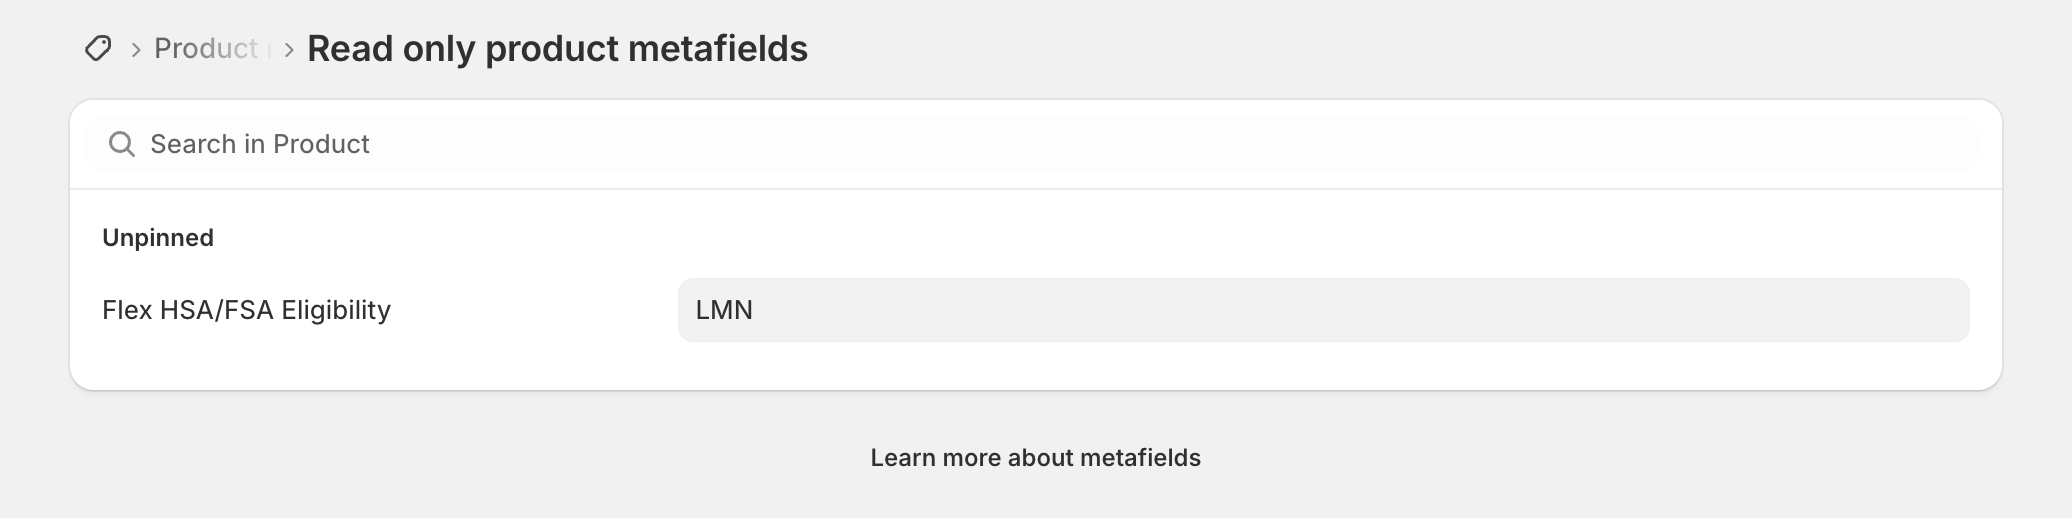
When you reinstall the app, Flex begins syncing each product's HSA/FSA eligibility directly into your Shopify admin as a read-only product metafield. You can use that data to filter products, build collections, and see eligibility at a glance, with no manual tagging required.
### View a product's eligibility
In your Shopify admin, go to **Products** and open any product.
Scroll to the **Metafields** section, click **View all**, then **More actions → Show read-only metafields**.
Look for the **Flex HSA/FSA eligibility** metafield. It's populated with one of three values:
* **LMN:** Eligible with a Letter of Medical Necessity (dual-purpose)
* **IIAS:** Always eligible
* **Ineligible:** Not HSA/FSA eligible
This field is read-only. The classification comes directly from Flex and can't be edited in Shopify.
### Create an HSA/FSA smart collection
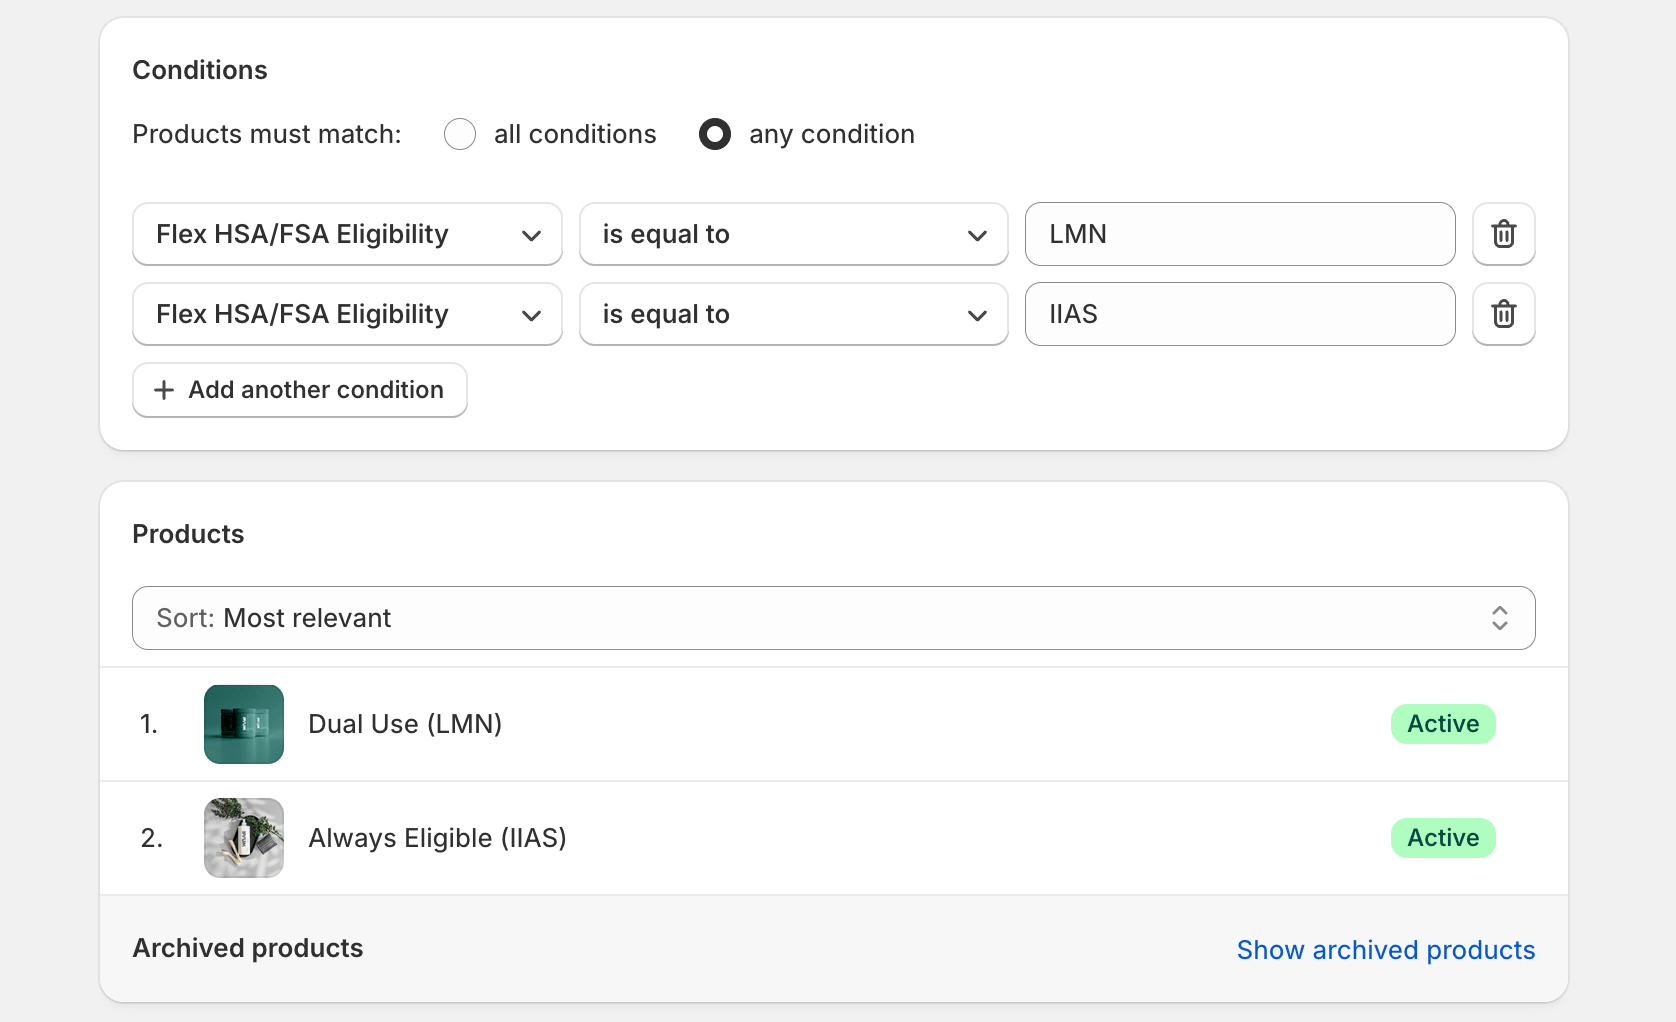
Because eligibility lives on each product, you can build a **smart collection** that automatically includes every eligible product, perfect for featuring on an HSA/FSA landing page.
Go to **Products → Collections → Create collection**, and name it (e.g. *HSA/FSA*).
Select **Smart collection** and set the conditions to match **any** condition.
Search for the **Flex HSA/FSA eligibility** field and add two conditions:
* `Flex HSA/FSA eligibility` **is equal to** `LMN`
* `Flex HSA/FSA eligibility` **is equal to** `IIAS`
This covers every eligible product and automatically excludes ineligible ones.
Click **Save**. Your collection now stays up to date automatically as Flex syncs eligibility.
***
## Product Badge
[Watch this chapter (4:40)](https://www.youtube.com/watch?v=MKLTWzIokHI\&t=280s)
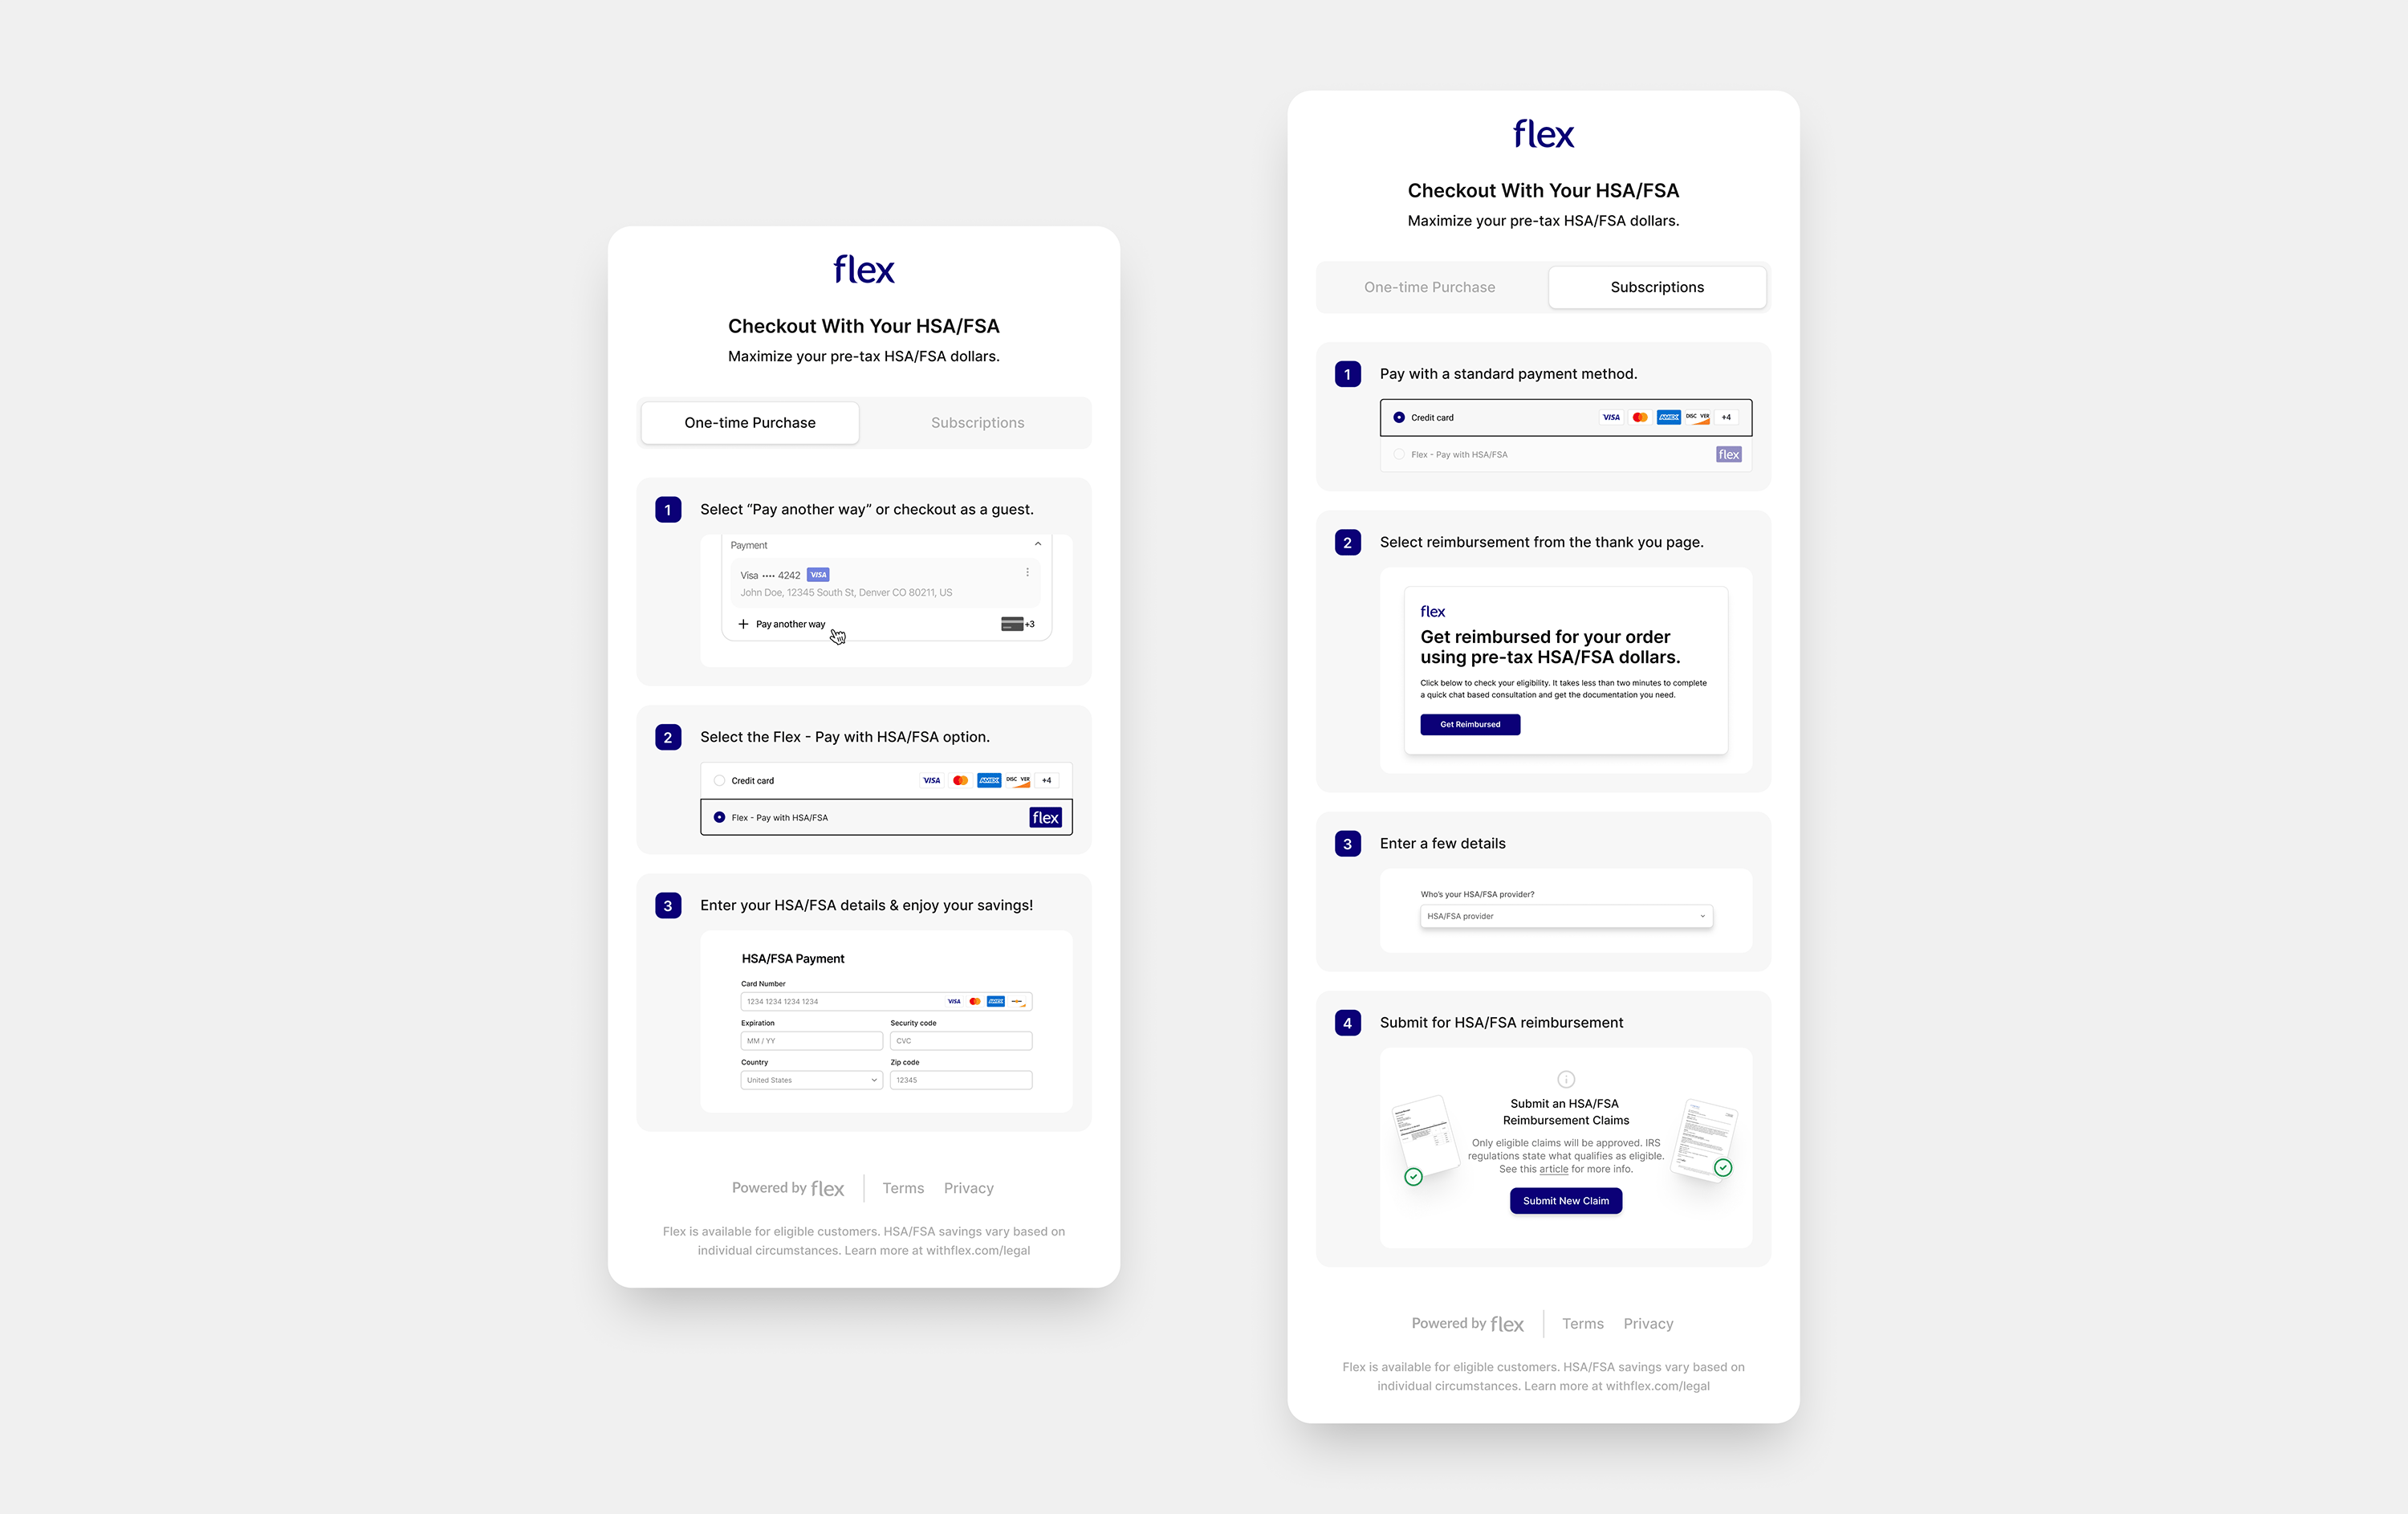
The Flex badge shows shoppers that a product is HSA/FSA eligible and educates them on how to pay, right on the product page.
In your Shopify admin, go to **Online Store → Themes** and click **Customize** on your live theme.
Use the top dropdown to select **Products**, then choose the template to edit (e.g. *Default product*). Because the badge shows correctly per product, you can use a single shared template across all products.
In the **Product information** section, click **Add block**, open the **Apps** section, and add the **Flex badge**.
**Default eligibility is no longer used.** This setting only applies to legacy Marketing App users. If you installed or reinstalled the Flex Marketing App after 07/07/26, you can ignore this field or set it to ineligible as a fallback.
In the right-hand settings, adjust:
* **Default Eligibility:** Legacy setting; you can ignore this or set to ineligible as a fallback
* **Show subscriptions tab:** Adds a Subscription tab to the pop-up
* **Style:** Light or Dark
* **Badge Alignment:** Left, center, or right
* **Badge Width:** 250–350px (the badge text scales with the width)
* **Custom font size:** Override the auto-scaled text (10–32px)
* **Custom letter spacing:** Fine-tune spacing (0–5px)
Preview the product page, then click **Save**.
If you don't sync product eligibility to Shopify, you'll need to create separate product templates for each eligibility type. We don't recommend this, as it's more manual to manage.
### Educational Pop-up
When a shopper clicks the badge, a pop-up explains how to pay with HSA/FSA. The correct experience is shown based on each product's eligibility.
**Subscription tab**
If you use [Flex's Shopify Subscription Reimbursement Solution](https://docs.withflex.com/developer-guides/integration/shopify/shopify-subscriptions), enable the **Show subscriptions** tab. This adds a second tab to the pop-up with steps for subscription customers to get reimbursed. We recommend all subscription merchants turn this on.
***
## Landing Page Builder
[Watch this chapter (8:35)](https://www.youtube.com/watch?v=MKLTWzIokHI\&t=515s)
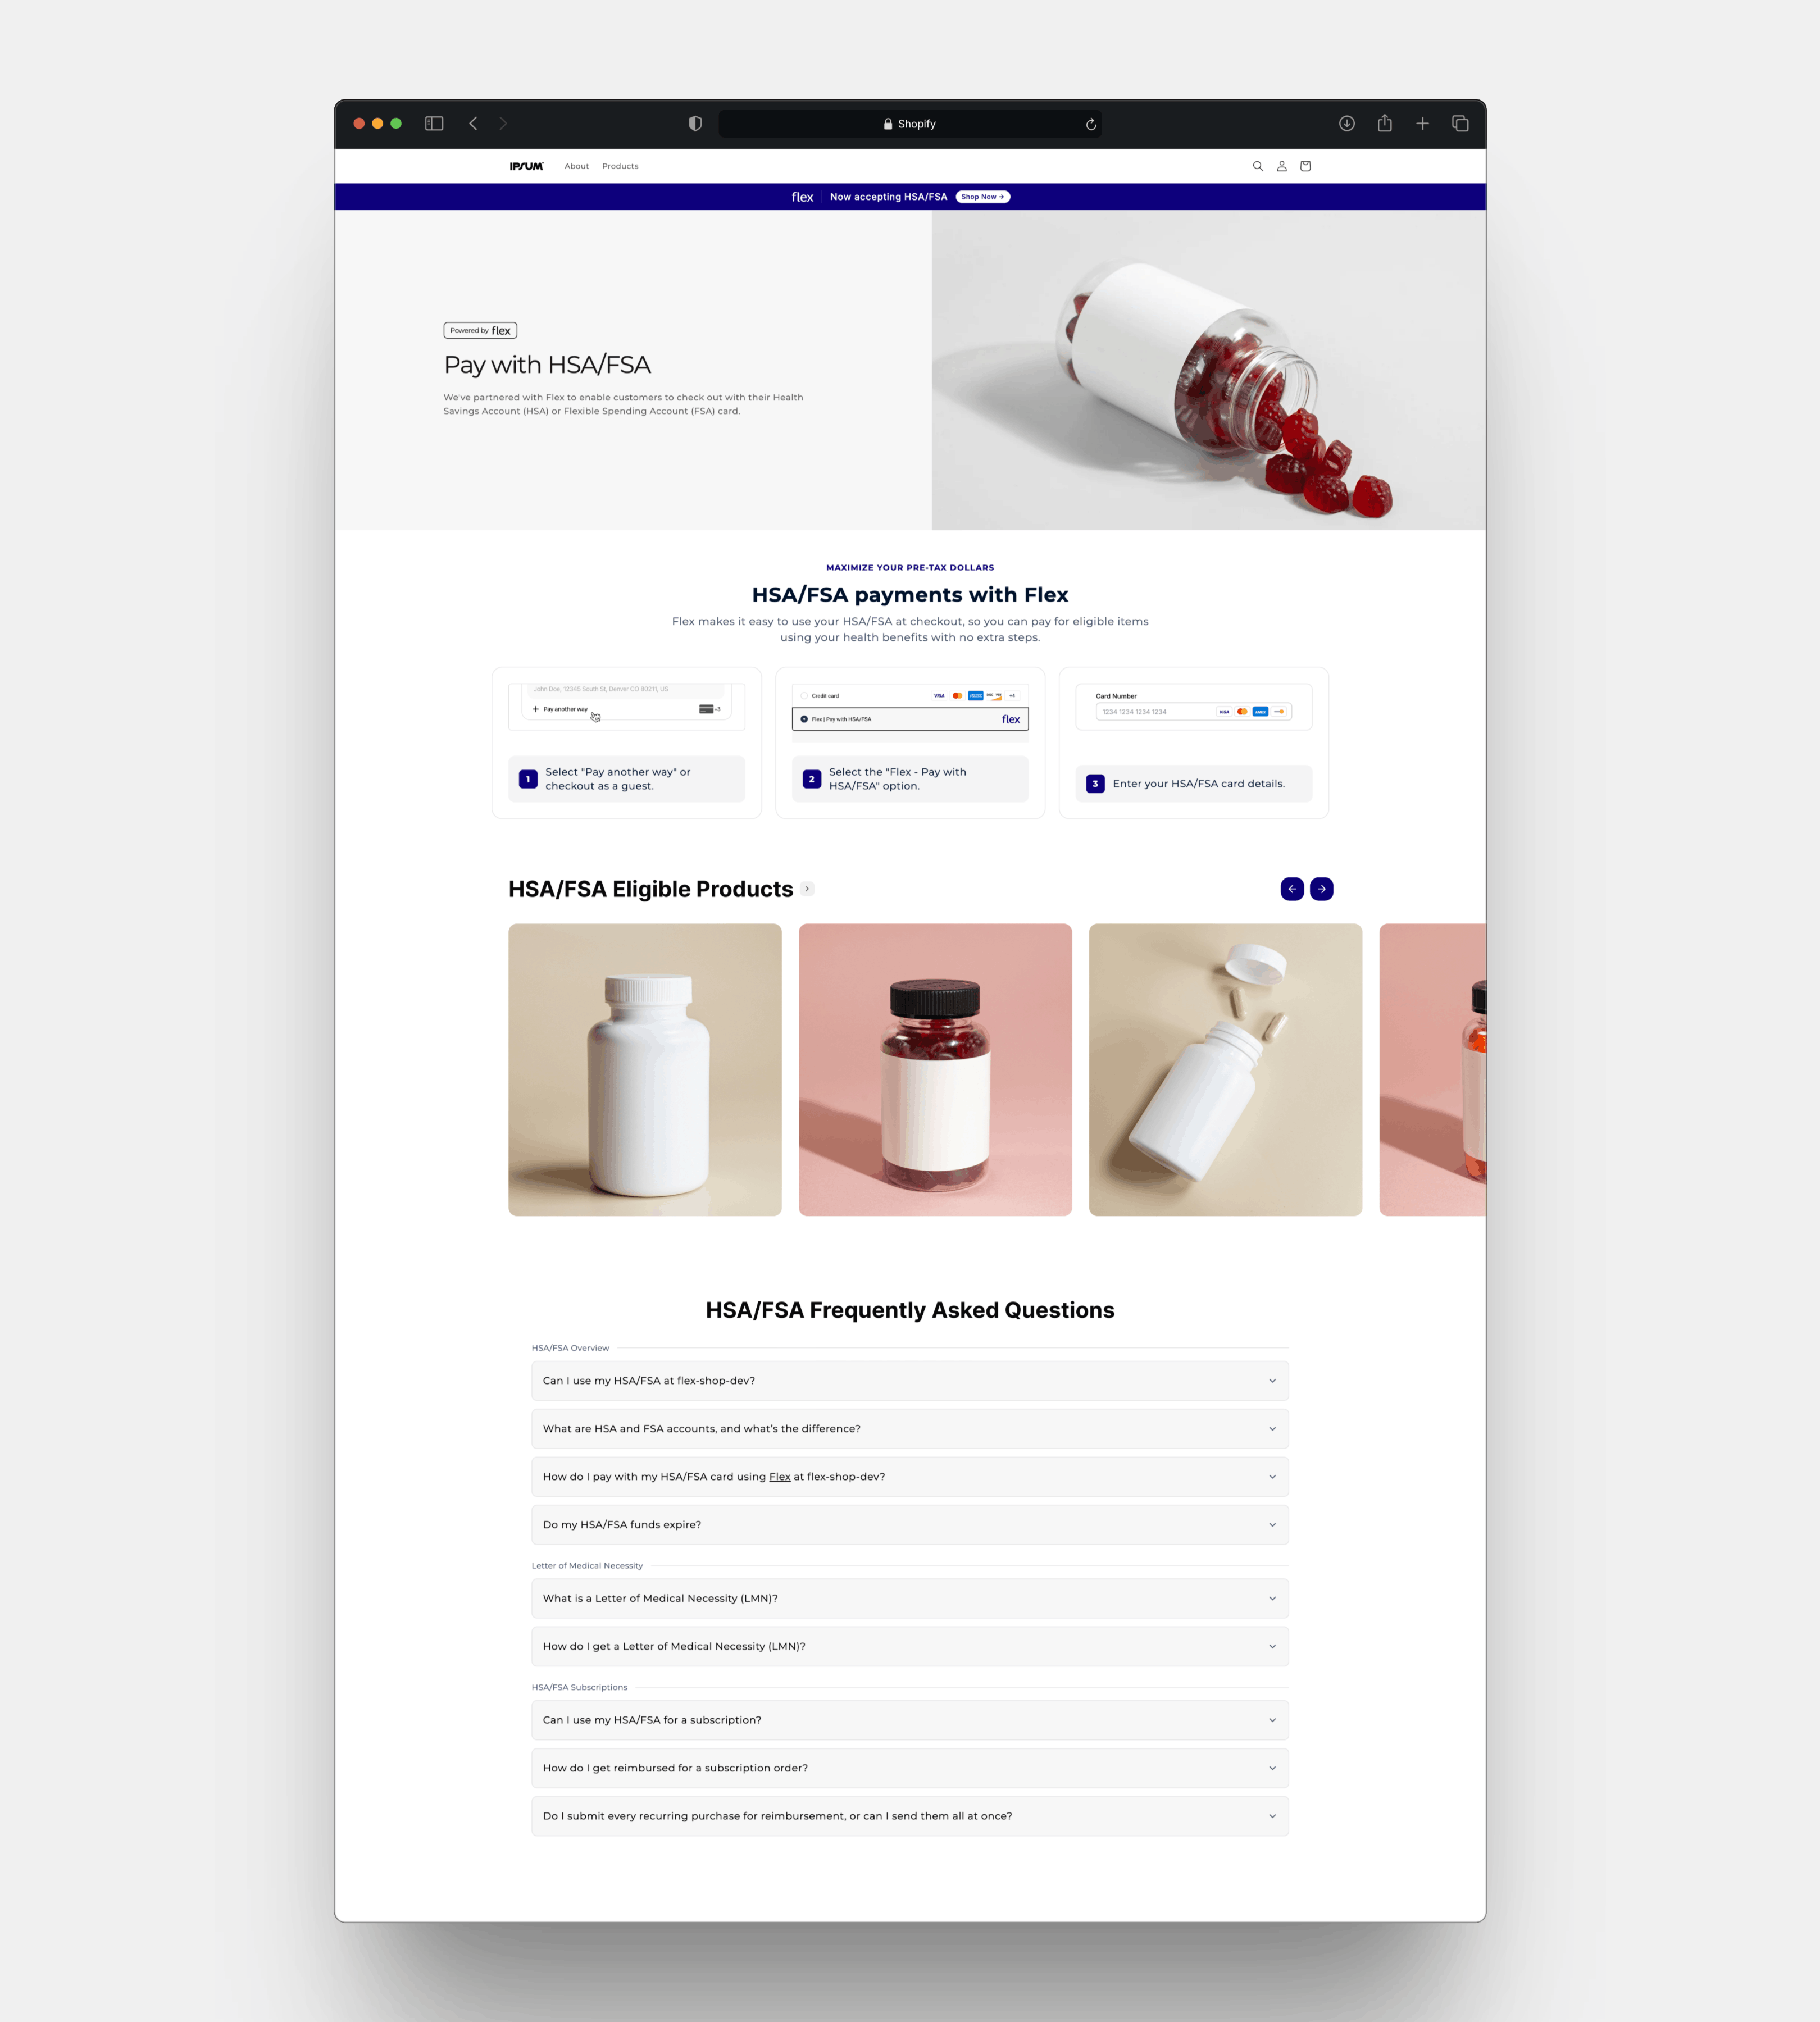
The Flex Marketing App includes pre-built blocks so you can quickly create a complete HSA/FSA landing page. Customize styles to match your theme and publish in minutes.
In your admin, go to **Online Store → Pages → Add page**. Give it a title (e.g. *HSA/FSA*) and set the URL handle (e.g. `hsa-fsa`). Keep it **hidden** for now. You'll make it visible once the template is ready.
Go to **Online Store → Themes → Customize**. From the top dropdown, select **Pages → Create template**, name it (e.g. *HSA-FSA*), and base it on your **Default page**.
With the page hidden, click **Add section**, open the **Apps** section, and add the Flex blocks below. Most blocks include an **extra padding** toggle you can turn off to make sections full-width.
* Flex Hero
* Flex Checkout Walkthrough
* Featured collection (standard Shopify block)
* Flex HSA/FSA FAQ
* Flex Subscriptions
* Flex Banner
Save your changes and exit the editor. Go to **Online Store → Pages**, open your HSA/FSA page, set the **template** you created, set it to **Visible**, and click **Save**.
Visit your store to confirm everything is displaying correctly.
***
## Block Library
Details for each block you can add from the **Apps** section of the theme editor. Every block is fully styleable: colors, fonts, sizes, and padding.
An announcement banner to highlight HSA/FSA on your store. Choose from preset messages or add your own, and customize colors, links, and display settings.
A full-width hero section with a "Powered by Flex" badge. Customize the image, colors, text sizes, and layout to match your brand.
A step-by-step guide showing customers how to check out with Flex. Adjusts based on product eligibility, with options to customize text, alignment, colors, and spacing.
Pre-written FAQs to help customers understand HSA/FSA and build trust. Includes built-in content to improve SEO, with options to customize styling and add more sections as needed.
Explains how subscription reimbursement works for customers. Customize colors, text, and layout to match your store.
***
## Not on Shopify?
For non-Shopify merchants, explore the rest of the Flex Merchant Success resources to implement HSA/FSA marketing solutions on your site.
This documentation is built and hosted on [Mintlify](https://mintlify.com), a developer documentation platform.
 ***
## Product Badge
***
## Product Badge

 ***
## Landing Page Builder
***
## Landing Page Builder
 ***
## Block Library
Details for each block you can add from the **Apps** section of the theme editor. Every block is fully styleable: colors, fonts, sizes, and padding.
***
## Block Library
Details for each block you can add from the **Apps** section of the theme editor. Every block is fully styleable: colors, fonts, sizes, and padding.